Thursday, December 8, 2011

Learn About Gemstones: Turquoise


The birthstone of December, turquoise, is also the planetary stone for Aquarius, Taurus, and Sagittarius. It's the gemstone for both the fifth and eleventh wedding anniversaries. Its name comes from the old French word for Turkish, because many centuries ago it was brought to Europe by Eastern Mediterranean traders, known as Turks.


The color of turquoise ranges from green to blue, depending on the amount of copper, aluminum, or zinc present. The formation of the gemstones takes millions of years when water leaks through rocks that contain those minerals. Finer grades of turquoise are rare to find, but in today's modern world, the introduction of different treatments and imitations have devalued the stone, yet made it also more accessible. Today, turquoise is mined in several countries around the world, including the United States, China, Iran, and Tibet.

Throughout the centuries, turquoise has been associated with luck, money, success, and love. Ancient Persians believed that it protected its wearer from death, but a change in color was a sign of danger or illness. Turquoise is also present in many Tibetan and Native American rituals because it enhances spirituality and kindness and eases mental tension.

An interesting history fact about turquoise is that in 1810, Napoleon Bonaparte gave his Empress Marie Louise a crown of diamonds and turquoise as a wedding gift. The crown originally had 79 emeralds accompanying the diamonds, but Napoleon had them removed and replaced with Persian turquoise.

Sunday, November 6, 2011

Handmade Round: Calendars


I recently stumbled upon the Calendar of the Month Club by Scout Creative, and immediately fell in love with their cute 3D DIY monthly calendars! And the best part is they are free and make for a great crafty project on the weekend :) You can see my attempt at the November 2011 calendar above. Isn't it fun?

As we're getting close to the new year, a new need arises - 2012 calendars. So I scouted Etsy to see what I'll find, and was pleasantly surprised by a bunch of talented artists who offer very unique and fun ways to keep track of the days. Have you bought your 2012 calendars yet?

By pamlostracco
By KarolinSchnoor
By SeriousWhims


By ImpressedDesign
By KatherineCodega

Friday, November 4, 2011

Monthly Finds: October 2011


I've decided to start a new blog series of monthly posts, where I recap the cool finds I've come across throughout the month. Enjoy!

Melting crayons
I'd love to try this crafty project some time soon! I've never seen this before, so I thought it was really cool! Check it out here.
Even better - in light of the Halloween festivities, you can use that technique to decorate pumpkins in a very unique way. Look at what Jenny has done - doesn't it look awesome?!


A Starbucks proposal
The couple had their first date at Starbucks, and Shane recreated it in the woods. It's incredible - so much thought and so many little details went into it! Check it out here.


Around the World in 2000 Pictures
For all you travel junkies out there - this is for you!


Tuesday, November 1, 2011

Learn About Gemstones: Citrine

Citrine is November's birthstone, as well as the thirteenth wedding anniversary gemstone. It's a rare variety of quartz that contains traces of iron which are the main factor for its pale yellow to brown color. Citrine's color range also contributes to its name - from the Latin citrina, meaning "yellow," which is also the origin of the word citron, or lemon.

Natural citrine is rare to find. In ancient Europe, only the richest people were able to afford it, until the discovery of its sister gem – the amethyst. Under heat treatment, amethyst turns yellow due to a reduction of its oxidation, and resembles real citrine so much that only a trained specialist can recognize the difference of the two stones. Nowadays, burnt amethysts are the most commonly traded version of citrine.

Today, citrine can be found in Southern Brazil – the largest supplier of natural citrine, as well as in France, Madagascar, France, and the Soviet Union. Some US citrine mines are located in Colorado, North Carolina and California.

Citrine is said to enhance creativity, treat depression, promote happiness and optimism, and protect you from self-destructive habits. It is also believed to help detoxify your body and cleanse the blood. Embodying the power of the sun, this yellow gemstone gives its wearer spiritual healing and peace.

Saturday, October 15, 2011

Marketing Corner: Tips for a Successful Craft Show


I've been to four craft shows so far, and thought I'd share some of the lessons learned and valuable observations for the future.

Once you find a craft show and your application gets approved, you need to start preparing for it right away. The more thought and time you put into it, the more prepared and successful you'll be at the event.

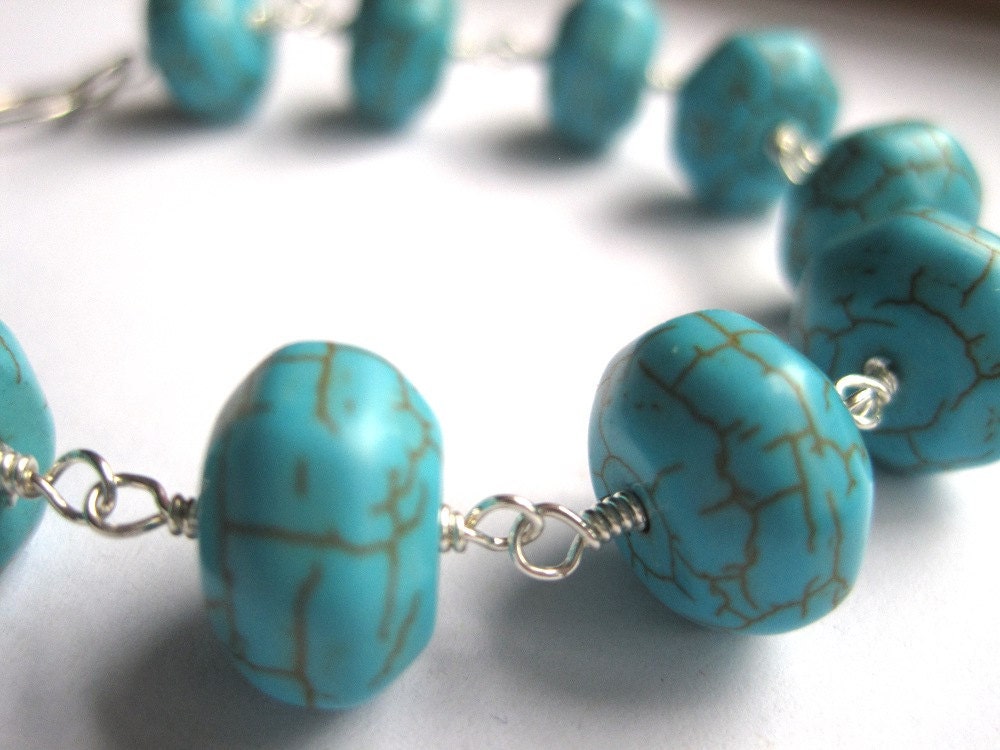
Make lots of stuff. The more you make, the more variety you'll be able to offer to customers. People have different tastes, and sometimes what you thought would be a best-seller ends up not being noticed as much, but other items seem to be more attractive to buyers. Of course, you don't have to have every single item on your table because you don't want to make your display look too crowded, but you can experiment with placement and products. Make sure you have a large range of options, as well as a wide range of prices. Which brings me to the next point...

Jewelry String Price Tags
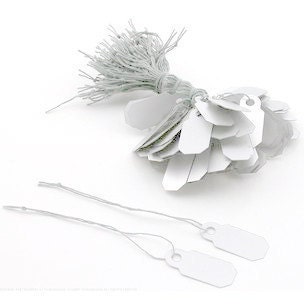
Make sure ALL of your items have a price tag or a sticker. Always. People would rather walk away from your booth than ask you how much something costs. Being able to see the price of an item right away would make them feel comfortable browsing and avoid this awkward situation. You can find price tags on Etsy (see link below), at Office Depot or Staples, or on Amazon. If you have a lot of items (and you should as pointed above), it will take some time to put a price tag on every one of them, but it's worth it! As you're tagging your items, prepare an inventory sheet with each item, its price, and quantity to keep track of. Bring it with you at the craft show and make notes when you sell items and at what price (in case you've given a discount), mark the items people are most interested in, and also make notes about possible custom orders.

Make a list of all the things you need to bring with you and pack the night before the show. Don't leave things for the last minute. Arrive as early as you can to have lots of time to set up. One of the shows I went to had an assigned time slot for each artist to come and unload at the loading dock. It only gave me a bit over an hour to set up before the show started and I barely made it! Make sure you give yourself enough time to set up. And if you have some time left before the show starts, walk around and introduce yourself to the other artists. Get inspired and observe how they do things - some of them are experienced craft fair goers and it's amazing how much you can learn from them! And you'll be surprised how many of them have a shop on Etsy, so you can keep in touch and maybe even find products you'd like to buy! A fun thing to do at craft shows is trade some of your items for somebody else's products :)

Try to give your table a sense of your products and style. Cover it with a nice table cloth. Depending on what you're selling, the color/pattern might play an important role, but for jewelry I like to choose a neutral color. I've heard some people bring flowers to decorate the table, so feel free to do that if you think it fits your theme. Create a banner for your business and attach it to the front hanging part of your table cloth, or maybe have an easel with a poster right next to your table.

Source
Bring lots of change for people who like to pay in cash. If possible, accept credit cards. Nowadays it's easy to make that possible. I know some people have credit card readers or other such devices. I personally use Square. You can hook it up to your iPhone, iPad, or Android and process a payment right away. The customer uses their finger to electronically sign and approve the charges, and then the confirmation can be sent to their email. Also, the processing fee is just 2.75%, which is a great deal!


Having a great display is crucial to bringing more attention to your booth and thus more sales. Make sure you product is UP at eye level. Also, think of creative ways to display your items. You can reuse something from your house or the local thrift store.
Source

- for jewelry, you can buy and old picture frame and fill it in with wire mesh (you can buy it at the hardware store). Your jewelry pieces can hang from the mesh - and it gives it a very unique but professional look. Here is a great tutorial on how to make your own.
Source
- reuse items from home: baskets, vintage trays and mirrors, cupcake tiers
Source


- use old books to pile them up and lift your displays
- old book shelves or filing units
Source
If you don't want to make your own displays, you can easily get them on eBay, Amazon, or even Etsy. Here are some Etsy shops that sell displays:
bluebirdheaven 

Be friendly and approachable! Smile! Don't sit, be up and visible, ready to answer questions or explain your product (if they seem to be looking and interested). Make sure people know they can touch and try things on, even if they don't end up buying anything. If you're selling jewelry, have a mirror at your table, so that people can see how it looks.

Know your product and try to make it personal - tell people how you made it, what materials you used and some interesting fact about the supplies or the process behind making it - something they can relate to.

Wear your product (if it's wearable). If possible, bring your tools and create things while you're at your table. People will see you making things on the spot and will be more interested to see your final products and respect your work.

Tell your friends and family about the show. They are your biggest fans and supporters, and you never know what word of mouth can do!

Important things to bring with you:
- Purell/wiping cloths
- tools for your craft - if you want to make your items as you sell, or just to have in case someone needs something to be customized or adjusted
- packaging materials, jewelry boxes (or whatever you're using for your items)
- business cards - encourage people to take one even if they don't buy anything. Also, include one in the packaging with every sale. I have a coupon code for 10% off of next purchase on the back of my cards, and let people know when I wrap up their purchase
- notebook and pens - you can use that to take notes about different items and people's questions/requests. You can also have it on the side of your table and have people sign up for you newsletter (make sure you reassure them that their emails will not be used for any other purpose)
- water and food/snacks - this is essential as not every craft fair has food vendors and also you may not have the opportunity to step out of your booth and go look for food and drinks. You can also bring some candy and put it on the side of your table. This is a great idea if you have some seasoned candy (i.e. candy corn for halloween, chocolate for Christmas, etc.)
- make sure you charge your phone/iPad/computer. If you bring a computer, you can prepare a slideshow with pictures of your items.
- bring some extra lights if you think you'll need them. This is especially important if you're selling jewelry or small items that need more light. Lights also attract the eye, so you can't go wrong with bringing some extra ones just in case.
- bring a friend! Not only to keep you company, but also to help you carry stuff and set up, keep an eye on the items if you need to go to the bathroom or if it gets too crowded in front of your table.


And last but not least - HAVE FUN! It's great to meet people and show them how much you love doing what you do and sharing your craft with them. Try to make the most of it, be cheerful, and remember that sometimes a non-sale is not always a bad thing. As long as people have a way of reaching you after the craft show is over, you still have sale opportunities.

Hope this helps and if you've been to a craft show lately, I'd love to hear about your experience!

Monday, September 5, 2011

In Search of the Perfect Statement Necklace

Product Information
I was invited to two black tie weddings this month, and as I was shopping for a fancy long gown, I also wanted to get a fancy statement necklace to go with it.
The gown I chose is a simple yet very elegant and complimenting black one-shoulder dress, with a long slit on one side, and a strip of dark beads on the other side. It's by Laundry by Shelli Segal and you can see it here or here. The thing I love about statement necklaces is that they can make a simple outfit look gorgeous and spice it up. This is exactly what I was looking for.
Product Information
Why was I trying to buy a necklace instead of make it myself, you may ask... Well, I was about to go on vacation for a week and then come back and go to the first wedding right away, so I didn't really have time to order supplies and make one. I thought it would just be easy to buy one if I found something worth spending the money. Buying online was also not an option as I didn't have enough time to get it shipped, etc., and besides, I really wanted to try it on before buying and see how it looks. Browsing the internet did, however, give me lots of good ideas about what I wanted.
Product Information
Alas! After several unsuccessful shopping trips, it was obvious that I had to make one myself.
It was a fun challenge! As you can see from my Etsy shop, I don't normally make over-the-top jewelry, but it was great for me to try something new and exciting to see the final result! I made a couple of trips to my local beads store and had to do some intense work to finish in time for my vacation, but the final result was so worth it. I was able to make a full set of earrings, bracelet, and the necklace.
Voila!
I got a lot of compliments on the jewelry and it was a lot of fun being a walking ad for my little shop :)
I've got lots of supplies left over and will be making some of these for my shop, so stay tuned for the new listings!

Wednesday, June 22, 2011

Spa Day - Homemade Hair Masks

Have you tried my homemade facials yet? As promised, here are a couple of recipes for your hair. These are great to do especially in the summer because your hair gets more damaged by the sun and trips to the beach, so it's definitely worth spending the extra 15 minutes to nourish your hair! Enjoy!

Banana and Avocado Hair Mask
Mix 1 medium banana, 1 egg, and 1/2 avocado in a bowl.
Add 2 tablespoons of honey, 2 tablespoons of buttermilk and 3 tablespoons of olive oil into the mixture.
Blend well. Apply to hair from roots to tips and leave for about 30 minutes.
If your hair is longer, you can double the ingredients. Do this twice a month for healthier look.


Egg & Yogurt Hair Mask
Beat 1 egg white until foamy. Add 6 tablespoons of plain yogurt. Apply to hair in small sections at a time. Leave in for 15 minutes. Rinse.
Egg & Olive Oil Hair Mask
Mix 2 eggs with 4 tablespoons of olive oil. Apply to hair, wrap head with plastic wrap, and leave for 10 minutes. Rinse well.

 
Do you have any recipes for hair care that you're willing to share?

Sunday, June 19, 2011

In the Kitchen - Gnocchi with Creamy Mushroom Sauce

I don't know about you, but one of my favorite Italian dishes is gnocchi - sort of like potato dumplings. I was craving them this weekend, so I decided to try to make them at home. I didn't realize how easy they are to make, but I do have to warn you that it's a bit time consuming. So put on your apron, pour a glass of wine, and be prepared for a delicious meal!
Ingredients:
For the gnocchi:
1.5 lbs russet potatoes, scrubbed (about 3 large potatoes)
1 cup all purpose flour (it may actually take about 2 cups)
1 large egg yolk, beaten
1 teaspoon salt
a pinch of freshly grated nutmeg
For the mushroom sauce:
1 lb sliced mushrooms
1 medium onion, chopped
1/3 cup whipping cream
1/3 cup brandy
parsley
1/4 cup butter (or less)

First, you need to bake the potatoes. Preheat oven to 400F, wash potatoes and pierce them in several places. Bake for about 1 hour or until soft. Take out of the oven and peel - russet potatoes are very easy to peel after baking, so make sure you do that while they are still hot (and don't burn your fingers). Smash the potatoes on a flat surface (a baking sheet or a big plate) and let them cool a bit.
Transfer to a large bowl and add 1 cup flour. Toss them around until coated well. Add the egg, salt and nutmeg in the center of the mixture, and stir with fork until evenly moistened. Transfer mixture onto lightly floured surface. Knead until dough comes together, and feel free to add more flour if dough is very sticky.


 And now, the fun begins! Form dough into a ball and divide into 4 pieces. Roll each piece between hands and surface into 3/4-inch-thick rope. This will feel very funny on your hands and is a lot of fun to do! Once you have the ropes, cut them into 3/4-inch pieces. Don't pile pieces on top of each other, but spread them around on the surface or on a baking sheet. You don't want them to stick together.

In the meantime, get a big pot of slightly salted water and when it starts to boil, dump the gnocchi into the water. Work in batches - you don't have to cook all of them at once, depending on the size of your pot. They will cook really fast and will start floating on the surface. Stir occasionally, and carefully transfer gnocchi to a bowl using a slotted spoon. The gnocchi are cooked!


Now, on to the creamy mushroom sauce. Melt the butter in a large pan and add the mushrooms and onions. Saute over medium to high heat until mushrooms begin to brown - about 10-12 minutes. Add the whipping cream and the brandy, boil until sauce thickens - another 5-8 minutes. Pour it over the gnocchi and mix well. And voila! My tongue was definitely doing the happy dance!

Do you have any favorite restaurant dishes that you've tried cooking at home?

Saturday, April 30, 2011

Mother's Day Sale

Are you still in need of a Mother's Day gift? Stop by my Etsy shop and enjoy 20% off with coupon code MOM20 at checkout - now through 5/8/2011. Depending on the time of your purchase, your order will be shipped either on the same day or the next day to ensure you'll get it on time :)

Sunday, April 24, 2011

Saturday, April 16, 2011

Pepi's Picks

Postcup(TM) by baileydoesntbark
Natural Wood Earrings by OrganicArchitecture
Cafe Mocha Shea Butter and Olive Oil Soap by SymbolicImports
Vintage Dress Watercolor Note Cards by jojolarue
Baby Elephant Ring by michellechangjewelry

How to Receive (and Give) Feedback

It's that time of year - businesses are doing their annual self-evaluations and reviews, and everyone is nervous about getting feedback on their performance. But as an Etsy seller (or any self-employed business owner), feedback doesn't come just once a year - it's a daily process. Whether you're asking for critiques in the forums, or you're receiving feedback from your customers on the products they purchased, or you're being asked to give your opinion on something, you're constantly exposed to feedback. As we all know, feedback can be both positive and negative, but it's always the negative criticism that makes us cringe and become defensive. Ironically, it's also the type of criticism that helps us learn from our mistakes the most and become better at what we do and who we are. Knowing how to give and receive feedback is a precious skill that few of us have, but it's something definitely worth learning how to do.

I recently spoke to Melinda who just started a blog where she showcases successful Etsy shops. She received requests from many sellers, and given her strict guidelines on what she was looking for, not all shops made the cut. For the ones that she rejected, she actually spent quite some time going through them and giving them a review on certain things that they can improve. Most sellers welcomed her feedback and were grateful that she spent time doing it, but others were not as nice. As I was reading about Melinda's frustrations, it got me thinking. Why were some people so appalled? Isn't this a great way of learning how to improve your shop and make it better? Why take is so personally?

A few days later I came across an article in Psychology Today about feedback, and it all started to make sense! I learned a few interesting fact too. Apparently, there are separate circuits in our brains that handle information - one for positive and one for negative phenomena. The negative information sticks the most, and no matter how many great and positive compliments you get, you always remember that one minor critique! Due to our sensitivity to negative feedback, sometimes we "see" criticism where it doesn't exist, because we tend to overthink other people's comments or remarks. And it all comes down to one thing - fear of exclusion. Once you recognize this, you can become better at accepting and giving feedback.

So, you ask, how can you make this work? If you are giving feedback, were you asked to? Nobody welcomes unsolicited negative feedback, but if they asked you for it, they are more susceptible to receive it. Try to use questions when giving feedback as a way of walking the recipient through the problem and making them feel part of a discussion. Think about whether you are "eligible" to give feedback in their eyes. If they don't see you as a qualified authority, it will only bring more negativity. And finally, don't be angry when you provide criticism - be nice and calm. If you are on the receiving end, take a deep breath! It's not going to be easy, but try not to take it personally, and really think about what you're hearing. Learn from it! And although it's hard to hear it, ask for feedback as much as you can!

Sunday, April 10, 2011

Spa Day - Homemade Facials

I'm a huge fan of homemade spa recipes. When I was a student and couldn't afford going to a spa, I'd go through my pantry and fridge and make some homemade spa concoctions for my skin and hair. If you haven't tried this before, I totally recommend it - they'll leave you feeling great and refreshed, without spending big bucks! Here are a couple of homemade facial recipes.


Coffee and eggs facial exfoliating mask.  You can do this after you've had your morning coffee. You need 1/4 cup of the used coffee grounds and 1 egg white. Mix the two ingredients well and massage the mixture gently on your face. Let it dry. Rinse it off with cool water and gently pat your skin dry with a towel.


Honey and eggs facial for oily skin. Whisk 1 egg white, and then add 4-5 drops of lemon juice and 2 teaspoons of honey (you can also use orange or grapefruit juice). Mix well and gently apply to your face. Let it stay for about 20-30 minutes and then rinse it off with cool water and pat dry your skin.


Make sure you're laying down while waiting for the masks to dry - gravity will cause the mixture to drip down and drag your skin downwards. Besides, why not just have some YOU time and relax!

Hope you enjoy those, and stay tuned for some homemade hair masks next time!

Saturday, April 9, 2011

Marketing Corner: On Packaging

Brainstorming. Hard work. Creating and crafting. Taking pictures. Editing pictures. Taking more pictures. Listing. Renewing. And finally...a sale!!! But alas, that's not the end! What happens after you get the sale is equally important to you business as branding and product quality. Excellent customer service leads to happy customers, and happy customers can become return customers.

We all love packages. In today's high tech world, snail mail feels like a blast from the past, a nice one too. When I receive a well packaged order, it always feels like opening presents, which makes me appreciate the seller even more. Etsy is becoming more and more saturated and it gets harder to single your craft out amongst so many sellers with similar products. Packaging is one way to set yourself apart.

One of my weaknesses on Etsy is bath and body products - handmade soaps, lotions, and candles. I've made purchases from several different sellers and their packaging has been wonderful. Below are some pictures of their lovely products.


So, you ask, how can you put that little extra touch to your packaging at a low cost? Here are some suggestions:

Use tissue paper to wrap your items. Even if you've already packed your products in plastic bags, wrap them with an additional layer of tissue paper, and maybe even add a nice tie around it.

If you're selling jewelry, invest in jewelry boxes. They are just a few cents each, but make for a wonderful presentation!

Include a nice thank you note or a thank you tag. This makes the packaging a bit more personal. You can easily make hang tags at home at no cost too!

Reuse and recycle materials. This will cost you nothing! Reuse tissue paper and wrapping ribbons from gifts, shopping bags, or even flower bouquets that you've recently received. You can also recycle the beautiful paper bags from department stores and create your own boxes - they are thicker and have great colors and quality paper!

Make your own envelopes or package boxes, and use unique labels on your packages. Recycle paper to make some fun envelopes. Many sellers offer free PDFs for labels or envelope patterns on their blogs. You can find some in this Storque article. Here is another great tutorial to make your own unique package bags from envelopes using decorative tape. You can also find get some great and affordable patterns on Etsy.

Include awesome business cards.  This could be expensive but will definitely set you apart!

If you are one of those people who always puts an extra touch to their packaging, feel free to comment and share what you do :)

LinkWithin

Related Posts Plugin for WordPress, Blogger...